How to Use a Vacuum Brake Bleeder for Efficient Brake Fluid Change
When it comes to maintaining vehicle safety and performance, regular brake fluid changes are essential. The process can often be messy and time-consuming, but using a Vacuum Brake Bleeder simplifies this task significantly. Renowned automotive expert Dr. Michael Smith, a leading figure in brake systems management, states, "A Vacuum Brake Bleeder not only enhances efficiency but also ensures that the brake system remains air-free, which is crucial for optimal braking performance."
This innovative tool uses suction to remove old brake fluid from the system, allowing for a clean and efficient fluid change without the common headaches associated with traditional methods. By effectively drawing out the fluid and air from the brake lines, a Vacuum Brake Bleeder helps to maintain the integrity of your braking system, ultimately enhancing safety on the road.
In the following sections, we will delve into the step-by-step process of using a Vacuum Brake Bleeder, providing you with the knowledge to not only improve your vehicle maintenance routine but also to gain confidence in handling this essential task. With Dr. Smith's insights and our detailed guidance, you will be well-equipped to perform a brake fluid change like a pro.
Understanding the Basics of Vacuum Brake Bleeders
Understanding the Basics of Vacuum Brake Bleeders
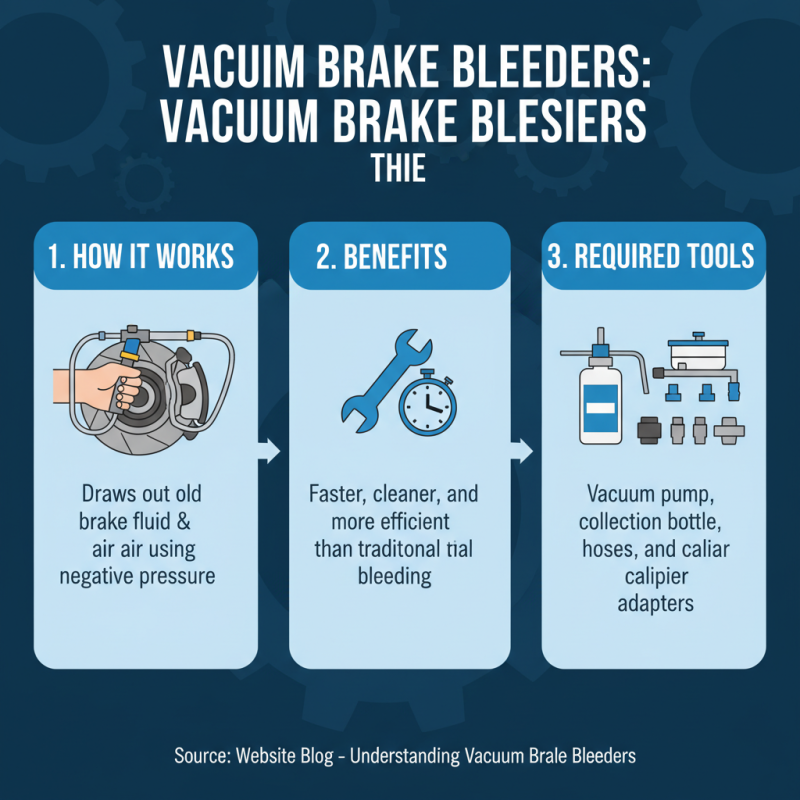
Vacuum brake bleeders are essential tools for efficiently changing brake fluid and ensuring the integrity of a vehicle's braking system. These devices operate by creating a vacuum that draws old fluid from the brake lines, minimizing the chances of introducing air into the system. According to a report from the Automotive Brake Manufacturer Association, proper brake fluid maintenance can enhance braking performance and extend the lifespan of brake components by up to 30%. This highlights the importance of regular fluid changes, particularly in vehicles exposed to harsh conditions or high mileage.
When using a vacuum brake bleeder, it is crucial to follow a few important tips. First, ensure that the bleeder is compatible with the type of brake fluid used in your vehicle—whether it be DOT3, DOT4, or DOT5.5—since improper fluid can lead to corrosion of vital brake components. Second, consistently monitor the fluid reservoir while bleeding to prevent introducing air back into the system. Many users find it helpful to periodically check the fluid’s clarity and viscosity as this can indicate when the change is necessary.
Utilizing a vacuum brake bleeder not only simplifies the bleeding process but also enhances safety. A study conducted by the Brake Safety Institute indicates that vehicles with fresh, clean brake fluid show a marked reduction in braking distance compared to those with degraded fluid. Thus, employing a vacuum brake bleeder for maintenance can be an invaluable practice for any vehicle owner looking to ensure optimal braking efficiency and safety on the road.
Gathering the Necessary Tools and Equipment
When preparing to use a vacuum brake bleeder for a brake fluid change, the first step is to gather all necessary tools and equipment. A high-quality vacuum brake bleeder is essential, as it creates a negative pressure that efficiently removes old brake fluid from the system. According to industry reports, using a vacuum bleeder can reduce fluid change time by up to 40% compared to traditional methods, which often involve multiple time-consuming steps.
In addition to the bleeder itself, you'll need a new bottle of brake fluid that meets your vehicle's specifications. Having a funnel can also facilitate a smooth process when pouring in new fluid. Additionally, a wrench set will be necessary to loosen the bleed screws on the brake calipers or wheel cylinders. It’s advisable to have a vacuum source, such as a shop vacuum or compressed air system, ready to ensure optimal functionality of your brake bleeder. Ensuring that you have all these items on hand can significantly streamline the brake fluid exchange process, making it not only efficient but also safe, as improper fluid change can lead to brake system issues, with reports indicating that up to 25% of vehicles on the road may have inadequate brake fluid levels due to neglect.
Step-by-Step Guide to Using a Vacuum Brake Bleeder
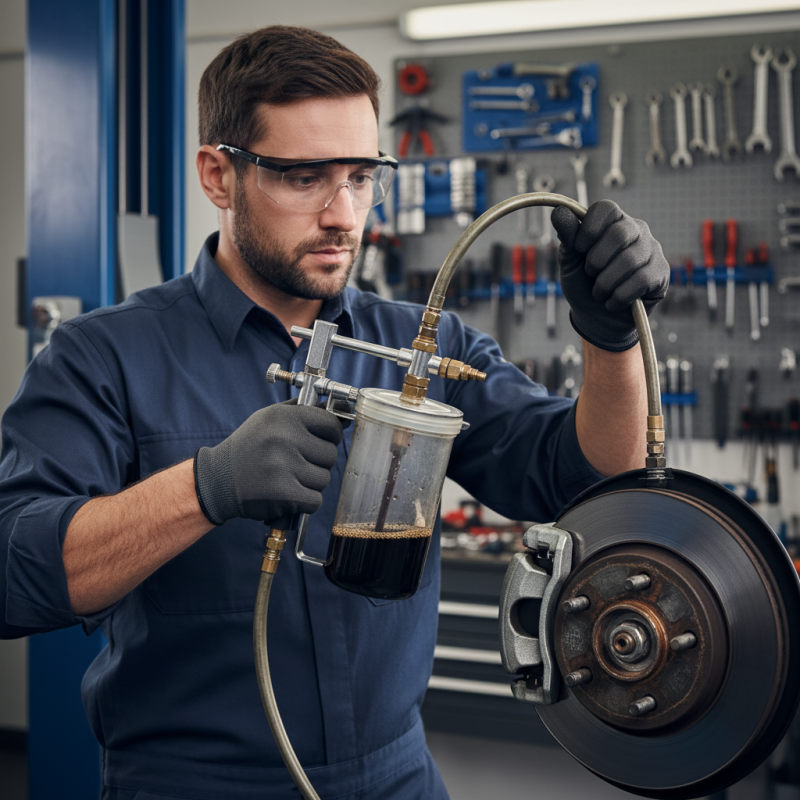
Using a vacuum brake bleeder can significantly streamline the brake fluid change process, ensuring that air is effectively removed from the brake lines. To begin with, make sure to gather all necessary tools, including the vacuum bleeder, a container for old brake fluid, and a wrench for loosening brake bleeder valves. Start by filling the master cylinder with fresh brake fluid to prevent the system from running dry during the bleeding process. This step is crucial as it maintains consistent fluid pressure and helps avoid introducing air into the system.
Once the preparation is complete, locate the brake bleeder valve on each wheel and attach the vacuum bleeder to the valve. Activate the vacuum pump to create negative pressure within the brake line, which will draw out old fluid and any trapped air. Keep an eye on the fluid level in the master cylinder; replenish it as needed to prevent air from re-entering the system. After a steady stream of fluid without bubbles is observed, close the bleeder valve and move on to the next wheel. Repeat the process for all wheels, ensuring each is bled thoroughly to achieve optimal braking performance. This systematic approach not only enhances efficiency but also contributes to safer driving conditions by ensuring that your braking system operates at peak effectiveness.
Common Mistakes to Avoid During the Brake Bleeding Process
When bleeding brake fluid using a vacuum brake bleeder, one common mistake is to neglect checking the fluid reservoir frequently. As you extract fluid from the brake lines, the reservoir can quickly become depleted, leading to the introduction of air into the system. This can compromise brake performance, forcing you to repeat the bleeding process.
Therefore, it’s crucial to keep an eye on the level of brake fluid and refill it as necessary to maintain a steady flow and prevent air from entering the lines.
Another mistake to avoid is failing to properly seal the vacuum bleeder’s connection to the brake bleeder valve. If there are air leaks in the system, the vacuum will not function effectively, leading to incomplete removal of old brake fluid. A loose or improperly secured connection can also cause fluid to spray out, creating a mess and posing safety risks.
Always ensure all connections are snug, and consider using tape to secure them if necessary.
By avoiding these pitfalls, you can enhance the efficiency of your brake fluid change and maintain optimal braking performance.
Maintaining Your Brake System After Fluid Change
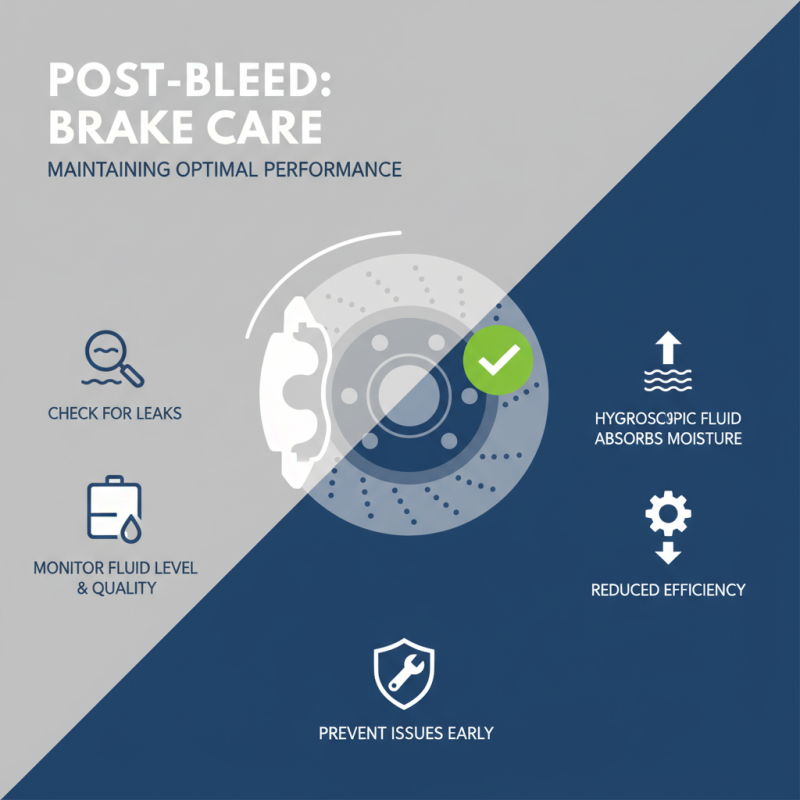
After successfully changing your brake fluid using a vacuum brake bleeder, maintaining your brake system is crucial for optimal performance. First, regularly check for any signs of leaks in the brake lines and connectors. Brake fluid is hygroscopic, meaning it absorbs moisture from the air, which can lead to contamination and reduced braking efficiency. Inspecting your brake fluid reservoir and lines can help you spot potential issues before they escalate.
In addition to visual inspections, it's important to adhere to a maintenance schedule for your brake system. Consider replacing your brake fluid every two years, or sooner if you notice a decline in braking performance or an increase in the fluid’s moisture content. During routine maintenance, inspect brake pads and rotors for wear and tear, as these components directly impact braking effectiveness. Ensuring that your brake system is in top condition not only promotes safety but also extends the life of the entire braking assembly, keeping you confident on the road.
 +86-13516964051


 CONTACT NUMBER
 CONTACT NUMBER